How To Upcycle A Welsh Dresser
Step by Step Furniture Upcycle Project: Welsh Dresser
Do you know what a welsh dresser is? I had no idea until I saw one in someone’s driveway a few months ago. Turns out it’s a traditional piece of kitchen furniture which dates back to the 1600s. Originally it was used for food storage and prep, and then it evolved into a way to display your finest crockery. They eventually fell out of fashion, maybe due to their size or because people prefer to keep their dishes in cupboards. However I’ve just upcycled the one I found, and I’m convinced they could make a comeback of epic proportions. And I’ve just checked, and there are loads for sale on Preloved. So if you’re feeling adventurous, get yourself an old welsh dresser and turn it into something spectacular. I’m sure you’ll fall in love with it just like I did. And to help you along the way, here’s how I transformed mine, step by step…
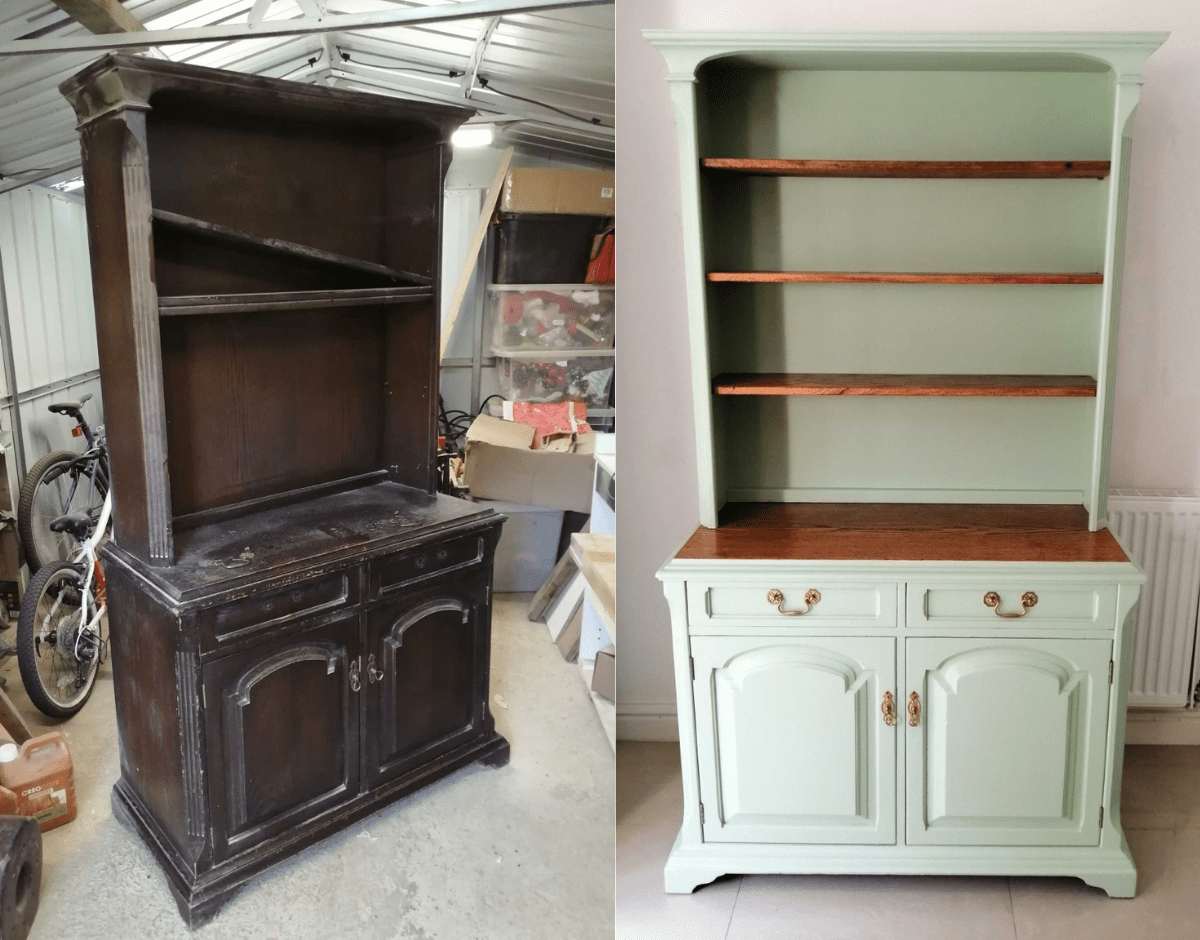
This is the original item, dated to the 1960s. Yes, it’s old and tired, but can you see the potential? Keep looking, I promise you it’s there!

Cleaning the brass fittings
First I took off all the grubby brass fittings and left them to soak in tomato ketchup for an hour. Sounds crazy right? However, the ketchup contains vinegar, which in turn contains acetic acid, which is able to loosen the dirt and grime. And the gloopiness of the ketchup helps it to stick nicely to the metal. And of course, it’s always a good thing to avoid the use of chemicals. I then took the fittings out and gave them a scrub with a hard toothbrush. The photos show the fittings before, during, and after the ketchup bath.

Sanding the Welsh Dresser
The dresser was originally finished with a dark lacquer which I felt was a bit over-powering for such a large piece of furniture. So I decided to totally sand back the shelves and worktop to reveal the grain and give them a nice modern finish. Here is one of the shelves halfway through sanding. You’ll see that once you punch through that lacquer, things start to look very different.

I then did the same to the worktop, and you can see here that the dresser is now stepping out of the 1960’s and into the modern world:

I then lightly sanded the rest of the welsh dresser which I planned to paint. I didn’t worry about going all the way back to bare wood, I just wanted to rough up the surface to give the primer something to stick to. It’s very important to get rid of the smooth lacquered surface, otherwise, you’ll probably notice that your primer and paint can be easily scratched off. And believe me, it’s a sad day when you have to sand off your primer and start again.

At this point, I also repaired any cracks and dents and replaced any wood that was too damaged to save. I now had a strong, stable, undamaged piece of furniture, which just required a splash of colour.
Priming and painting
After covering up the shelves and worktop, I used my spray gun to put on 2 layers of primer. It worked ok. and was very fast, but personally I still prefer to use a roller and a brush. I feel like this gives me more control over how much I apply, and I generally end up with a slightly better finish. But maybe I’m just not very good with a spray gun.

I left the primer to fully dry for a few days, and then applied the paint. I chose a pastel green colour called Tabernacle from Little Greene. I’ve tried using cheaper paints in the past but I’m usually unhappy with either the finish, the colour, or the durability. After you’ve put so much effort into the project, it’s worth investing in a good quality paint that will complement all the great work you’ve done.

Oiling and varnishing the wood
First I used teak oil to bring out the grain pattern. Or as all the cool upcyclers say, “make the grain pop”. I then applied 3 coats of polyurethane varnish to give the wood a tough outer coat with a nice sheen. I used 400 grit sandpaper after the first and second coats to achieve an ultra-smooth finish, but I didn’t sand the final coat because the sandpaper slightly dulls the varnish.

Something fun
I lined the inside of the cupboard and drawers with self-adhesive paper that looks like sweets. This is a great way to add an element of fun and creativity to the project, and you can use any pattern you like. It also has a functional purpose, as it protects the paint from scratches and scrapes. But a word of warning. My kids started licking the paper to see if it tasted like sweets, so watch out for that if you’ve got little ones!

The end product: My Upcycled Welsh Dresser
It was incredibly satisfying to save this piece of furniture from landfill, and then turn it into something that I really love. If we can encourage more upcycling it would result in reduced environmental waste, and less need to produce new products. So get out to your local recycling centre, check the skips in your street, or pick up a bargain at Preloved.
And remember... It’s not about what it is. It’s about what it can become!

Take a look at Sean's social channels:
I'm an eco-friendly woodworker and I specialise in scrap wood projects where I divert waste wood from landfill and turn it into something unique and useful. I aim to inspire people to be creative with their waste wood rather than discarding it.
