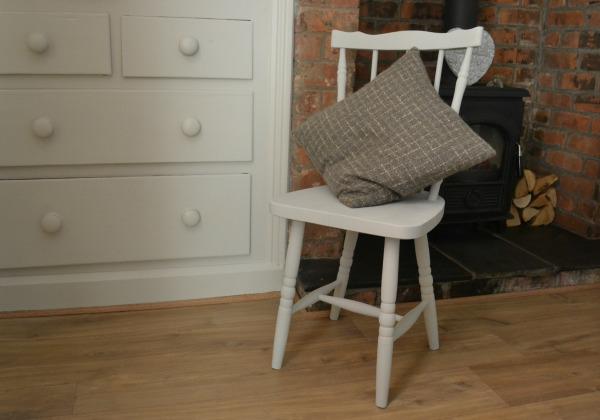
Upcycling Furniture ideas | Windsor Chair
With the world’s resources being squeezed into overdrive, it is important we take it on ourselves to make changes in our lives to try and be more sustainable. Along with the big life changes we can make - like eating less meat, installing solar panels on the house and moving closer to work in order to sell the car - there are less obstructive changes we can make like taking a pack lunch to work, being strict with the energy bills and of course...buying second hand.
One of the most rewarding ways to make the most of the thousands of second hands goodies you can find on Preloved, is by upcycling a piece of furniture to suit the décor of your home. Making a piece of furniture your own cannot only give you a great sense of achievement, you will also be making a truly unique piece of furniture to call your own.

It really couldn’t be simpler, and to show YOU how simple it can really be, I have had a go upcycling a simple spare wooden chair, into a feature piece of furniture for the bedroom.
Step 1: Where to find an affordable second hand chair?
You can find loads of great second hand furniture in our furniture and fittings category. From classic Windsor wooden chairs, to one off foot stools, there is plenty of potential first time projects to choose from…I would suggest perhaps starting small and working your way up, unless you fancy the challenge of a double wardrobe!
Step 2: What will you need to upcycle a wooden chair?

- Sandpaper of sanding sponge
- Wood primer – make sure this is for hard and soft wood, most wood primers are for general use, but always read the tin, We went for a quick dry 2n1 primer and undercoat.
- Paint brush – make sure you find one suitable for painting furniture, to ensure your upcycled chair has a smooth finish
- Damp cloth – this is to clear off the dust once you have sanded
- Furniture paint
- A sunny weekend! – Make sure you get everything the day before if you can to give yourself the whole day/weekend to sand and paint for chair. You will have to wait up to 4 hours between coats when priming and painting your chair so bear this in mind. Always read the tin for the recommended dry time between coats.
Step 3: How do I sand down a chair?
 Sanding your chair will be key in ensuring your primer and paint stick well to the chair, giving it a smooth even finish…it is also a great way of removing previous varnish and paint drips on your chair, so be prepared to put in some elbow grease! First things first, choose your weapon! I went for a sanding sponge as it is a lot easier to get into all the nook and crannies using the corners of the sponge.
However, if you only have sandpaper then this will do just as good a job. To ensure you get the old varnish and/or paint out from those creases, try folding the sandpaper in half like we have shown below.
Sand the whole chair with the same amount of vigour as you would the seat and back of the chair, although the legs will get less attention once your chair is finished, it is still important they get as much love as the rest to the chair looks finished. Sanding chair legs can be tricky. To save your back and  knees, why not try sitting on a step or chair and placing the chair seat down onto your legs? This way you can get good view of the legs and sand away happily without straining your body.
Keep sanding until there is no varnish shine on the surface of the wood. Remember to wipe the dust away with you finger before checking! Once you are happy all previous varnish and treatment has been sanded off, wipe the chair down with a damp cloth to remove all the dust…you won’t want this in you paint!
Step 4: Time to prime! What is the difference between primer and undercoat?
 Primers tend to seal wood in preparation for further coats of paint, whilst undercoat provide a smooth even base coat for a top coat. I went for a 2n1 primer and undercoat to save some time and ensure I had covered all bases.
When you are painting underlayers, paint thins layers and with the grain of the wood to ensure you get a smooth finish. Expect to do at least a couple of layers before adding top layers, allowing for up to 4 hours dry time between coats.
Step 5: How many coats of furniture paint do I need to do?
Now that your chair is fully primed and ready to go, you won’t need to use many coats of furniture paint to get the desired colour and finish. Depending on the colour and the paint, you might get away with just doing 2, but shouldn’t need to do more then 3. Like with the primer, take your time making sure all the little imperfections on your chair are filled in, and paint in line with the grain of the wood.

And that’s it! If you bought new tins of paint, you will probably find you still have quite a bit of primer and paint left. Don’t let this go bad in the shed! Make sure the lids are on tight and save them for your next upcycling project to match your chair. If you feel you will probably not use this paint again, why not try selling it on Preloved?