DIY Foosball Table from an Old Shoebox

If you want to try DIY but you feel like you aren't that handy, have a go at this simple DIY Foosball Table with a super fun result! I have made a fair share of DIY projects and I must say this one is one of the easiest.
What I like about this pocket foosball is the fact that you can make it with the help of your kids, something that isn't that common when it comes to DIY. You can spend time together while building this interesting toy and that is a priceless opportunity.

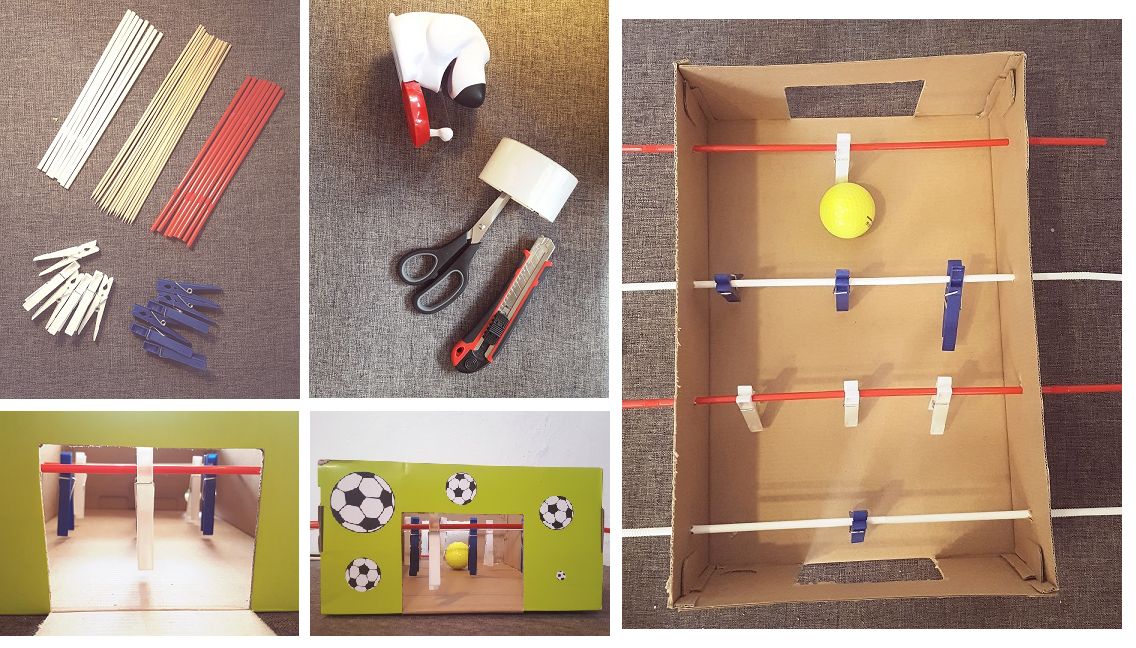
As you can see from the picture, everything you will need for this project is probably in your storage already. You will need basic things like a cardboard box, straws, grill sticks and clothespins. From equipment, you will need scissors, glue, ruler, marker and some colours.
So, let's stop with the introduction and start building your DIY Foosball Table!
1) First, you have to cut the box. If you aren't sure how the box should look like when you are done with it, google "foosball table" and take a look. You will have to make two big holes for the goals and 3 or 4 small holes for the rods.
Now, the number of holes for the rods actually depends on the size of your box. You have to place them with the same space between them and you have to be sure that they aren't too close to each other. That is why 3/4 rods on one side should be fine. Once you've decided about the number of rods, cut the holes for the rods and the goals.
2) Time to give the kids something to do! Give them the box and let them colour it from the outside. When they are done, let the box dry.

3) While they get cracking, you can continue to make the rods. There are many ways to make them, but I have found straws with kebab sticks through the middle to prevent bending to be best. Close both ends of the straws with a glue gun (if you have it) or with a small amount of cotton wool and glue it. Now, let your rods dry and we can continue to the next step.
4) The only thing that is missing are the players, which you can use pegs to replace. Separate the pegs into two teams and colour them with two different colours so you can see which player is for which team. Again, let them dry.

5) We are almost done! All we have to do is assemble your DIY foosball box! Start with the rods and the box, pop the straws in their holes and then add the players. Only put the players on the rods when you are absolutely sure that they are at the right place, glue them to the rods. Players mustn't move on the rods, just like the real foosball table.
6) Now, all you have to do is what for the glue to dry, find the ball and let the foosball tournament begin!
If you want to here more Foosball tips and more DIY Foosball hacks from Mark at FoosballZone, why not check out his blog here?
Mark looks after the blog FoosballZone, where you can find all the hints and tips you might need for getting started in all things Foosball


