Upcycling Furniture: How to Create Perfectly Painted Stripes

Upcycling Furniture: How to Create those Perfectly Painted Stripes
Hello everyone! I hope you are all safe and well during this surreal wave we are all riding right now. One of the main reasons I love working for myself, upcycling furniture at home, is that I can work around family life, with no pressures of deadlines, and no rota to stick to. Plus, if one of my two children is poorly, I don’t have the dreaded mum guilt! So, when as a country we went into lockdown mode, it didn’t affect us too much as a family to have the children suddenly at home from school ‐ although my evening gin consumption has definitely increased! (mega fist pump to all the teachers who do this daily!)
My two children are very much used to seeing ‘mummy’s work’ dotted around our home downstairs. Furniture makeovers in their various stages of completion are literally like part of the furniture now in our home, so the kids don’t tend to go near them. Whilst they’ve been cracking on with their crafting activities, I’ve been to the side of them able to paint away, upcycling furniture nicely. This time at home has given me an opportunity to chip away at my stores of vintage furniture pieces and because I’m unable to collect more pieces right now (= happy husband!), I can work with those I’ve had sat in my workspace for some time.
When I was approached by Preloved to write a 2nd blog for you all, I was struggling to pinpoint a particular subject to chat to you all about, without drifting off-topic. So, I thought what I’d do is take you through my latest furniture project and its stages, with some hints and tips thrown in for good measure! Now I’m not claiming to be an expert, I believe especially in this industry you’re always learning and absorbing new information. I just recognize from experience that if I knew some of these things when I first started upcycling furniture, it would’ve saved me a whole load of time, money, and patience!
I’ve broken the tutorial down into steps to try and keep it easy to follow, but if there’s anything you’re unsure of please don’t hesitate to contact me‐ I’m happy to try and help! So here goes...
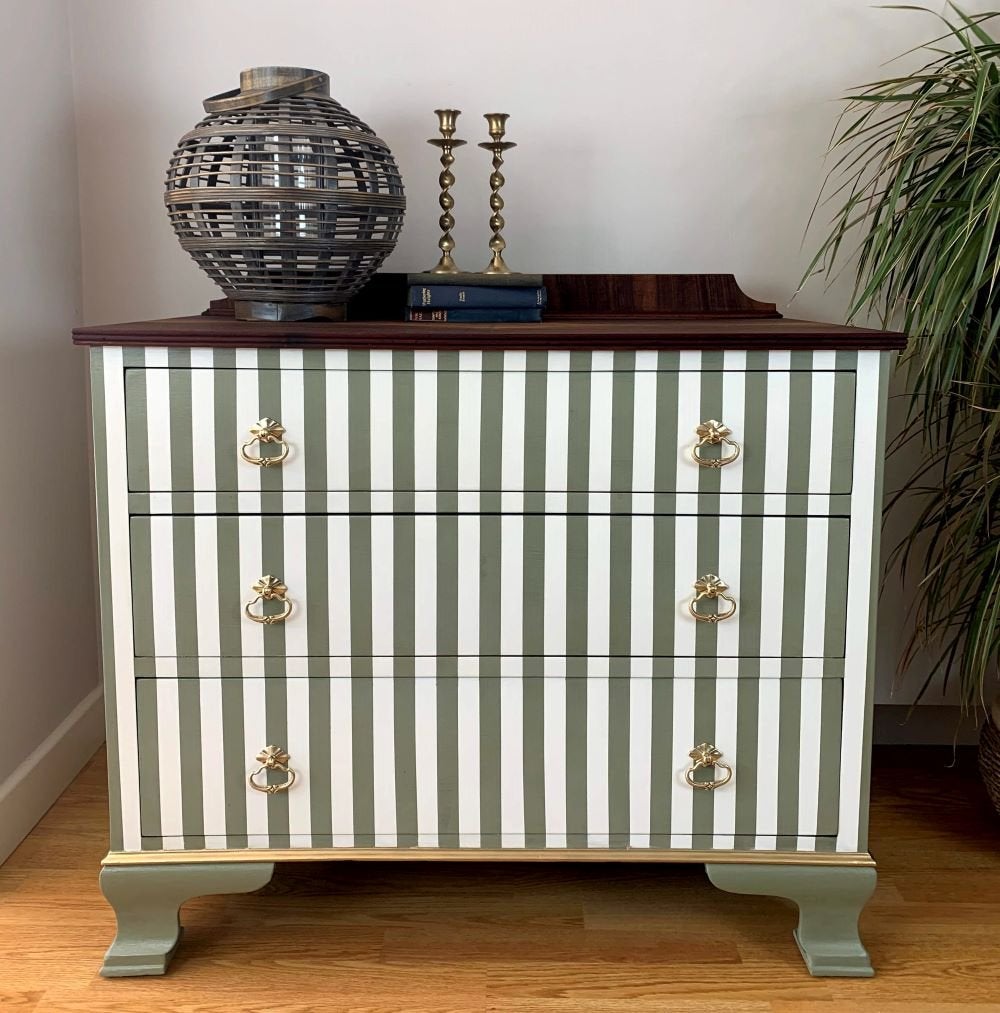
The piece I’m working on is a vintage chest of drawers from the 1960s. I know this because I found a lady’s lifestyle magazine tucked down the back, dating from 1964. It made a very interesting read over a cuppa. This piece was tired, grubby, and thick with old varnish. I decided to paint it using stripes. I’m a mega stripe fan‐ they’re clean, classic looking, and super easy to do once you’ve grasped the basics. Whether you prefer a retro look, shabby chic, rustic, or geometric ‐ there are so many possibilities. I’m asked often how they’re done, so I thought this would be a perfect way to show you how.

Before I did anything, it needed a deep clean and some preparation. Now I know a lot of paint brands say you don’t have to do any preparation before popping open that paint can, but in my opinion, a little prep goes a long way. I always clean my pieces inside and out using sugar soap in a spray bottle. This will remove all grease, grime, and build up. I then sand the entire piece to get rid of the surface shine and smooth out any lumps and bumps. As a precaution, I then primed the base and drawer fronts. I chose to sand the top back completely and nourish with oil instead of painting as I knew I was using lighter colours. This not only prevents the dreaded bleed through but also gives me a lighter base to apply the lighter colour too. After applying my main base colour which was a soft sage green and allowing it to dry fully overnight, this piece was now ready for some stripes.
Perfectly Painted Stripes Step by Step:


12. This is my favourite part! Taking off the tape! Starting from the top, gently pull away from your tape. This is where you’ll be glad you did that bit of prep and invested in some high-quality low tack tape, as you shouldn’t have any tape pull away from your piece. If you do don’t panic, you can touch it up with a small detail brush. Now, how good do those lines look?!
13. I decided to add a metallic gold trim to the bottom edge, then once dry I applied 3 coats of a matt lacquer. I always use a small microfiber roller to apply my topcoat‐ I find you avoid brushstrokes and get lovely even layers. A good tip is to line your roller tray with tin foil before using it. This stops any contamination from the paint tray and makes cleaning up super easy‐just roll up your foil once you’ve finished and thrown away!
14. I’m an absolute magpie when it comes to vintage drawer pulls, I’m always rummaging around local charity shops seeing what I can find. A lot of the time the hardware is just as dirty as the piece itself, image how many pairs of hands have been on them! They are usually dirty, tarnished and in need of some love. Now I’ve tried all sorts of cleaning methods; wire wool (my poor fingers!), brass cleaning products, vinegar baths, tomato ketchup! Personally, they didn’t work for me. It was taking too long. What I found the easiest, quickest, and most cost-effective is this…. A fine high grit flexible sanding sponge. I buy mine in packs of 10 super cheap from the local builders centre. I also use these to fine sand in between coats to get a super smooth finish. Sand over your hardware like you’re buffing your nails girls and just watch them shine! They remove the dullness and bring the shine right back up, you can also get into all the little nooks and crannies because the sponge is so flexible.

All that’s left to do now is pop the hardware back on and step back and admire. I hope you’ve found this step by step useful and can take one or two things away with you to try out when upcycling furniture of your own!
Best wishes and happy painting,
Amy x
Read my first blog for Preloved here, How I began Tickety Boo Interiors.
You can visit my Instagram page here
For more Upcycling Fun, Take a look at:
Hiya! I’m Amy; Wife, mother of two and the painter behind Tickety Boo Interiors. Originally from a retail management background, I’ve now moved from fashion retail to furniture painting. I love colour and getting creative, so my style is vibrant and eclectic. When I don’t have a paint brush in my hand there’s usually a cup of coffee, G&T or glue gun in it instead!


